 Is your guitar making an annoying buzzing sound?
I’m guessing you’ve done some research and found that it could be a ground loop that is causing the buzzing.
And it very well might be just that. But other issues can cause humming or buzzing, too.
That’s why you first want to make sure yours is caused by a ground loop, before you go about grounding your guitar.
We’ll tell you how to determine that below. And if it turns out your guitar needs to be grounded, we also tell you how to properly ground your guitar.
Table of Contents
Why Ground A Guitar
The main reason to ground your electric guitar is to get rid of unnecessary noise caused by the electronics.
Maybe it’s a little hum that you just don’t like, or maybe it’s a terrible, saw-like buzz that screams from the amp when you connect it to your guitar. And it’s only made more prominent if you play with tones that rely on a lot of gain.
This sound, however small, is caused by a ground loop, and is actually quite easily taken care of. We’ll get to that in a bit.
For now, what you need to know is that the ground loop is the same as you might get on a home stereo system and it is amplified by electromagnetic interference, which we’ll call EMI, and radio frequencies, which we’ll call RF.

EMI and RF gain entry to your guitar’s signal chain because of aground loop. They’re caused by every day things, like electric motors, fluorescent lights, light dimmers, microwaves, radios, or power transformers.
But how do you know if you actually have a ground loop issue and not something different?
To find out, plug your guitar into your amp. I’m guessing there’s a hum, or you wouldn’t be reading this article. If there is a hum from the amp without the guitar plugged in, then the amplifier is obviously the problem.
But if the hum is only there when the guitar is plugged in, touch the strings. If the humming stops, you don’t have a ground loop issue. This happens because the guitar actually grounds you.
You are, in effect, a big electrical antenna. You attract EMI, which is then transmitted into the signal chain of your guitar. When you touch the strings and are grounded by the guitar, the hum stops.
If you touch the strings and the hum carries on, you’ve more than likely got a ground loop issue that needs sorting out.
Beyond the hum and buzz, there is also an element of safety to grounding your guitar. Any electrical device that isn’t ground properly has the proclivity to give you a shock – a nasty one in some cases.
With guitars, it’s hardly likely to stop your heart, but there is always the risk that it’ll give you an uncomfortable little nip if there is electricity running unchecked through it.

Something to consider, is whether your guitar has active or passive pickups. If they’re passive, you’ll have to ground them because they don’t have any active pre-amp circuitry.
This means that the signal isn’t amplified in any way before reaching the guitar amp, and as a result, isn’t strong enough to reduce the amount of noise and static that increasing the volume on the amp will produce. Of course, you could always play without an amp, but it’s obviously not the same.
If your guitar has active pickups, you’re in luck. No grounding is needed – it has got a ground that is activated when the lead is plugged into the jack.
Before we get too far into how to ground your guitar, if you have single coil pickups, and are here to learn how to stop the buzz they make, you’re out of luck.
Single coils will always buzz, unless you modify your guitar and add another pickup (much like with humbuckers). That’s because the single coil holds hundreds of looped wires, which act as an antenna – an antenna that picks up the EMI and RF mentioned earlier.
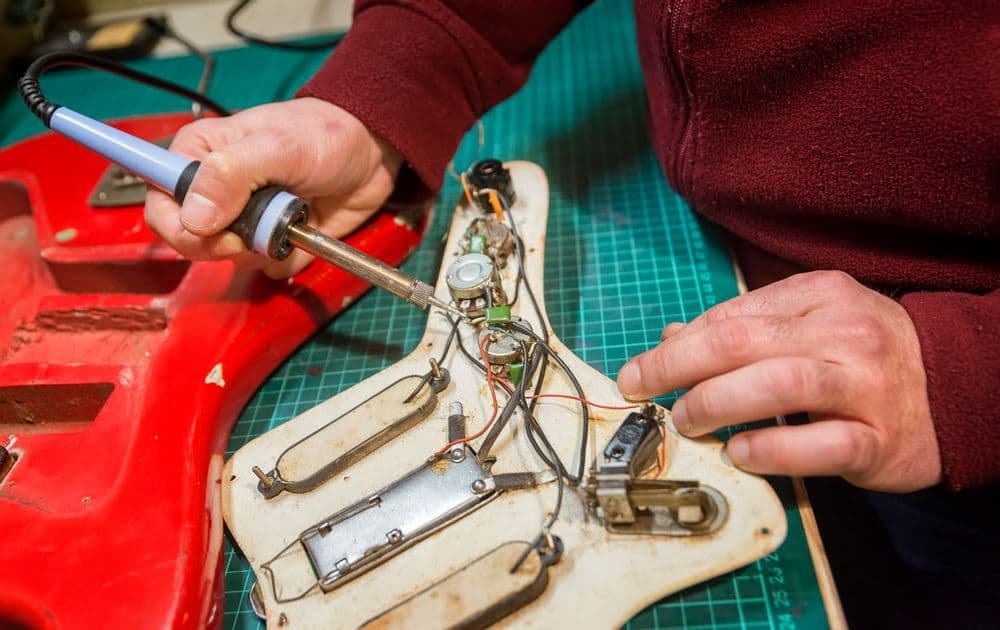
How To Properly Ground A Guitar
Materials Needed
- Solder
- Soldering iron
- Wire
- A sponge or cloth to clean the soldering iron
Method 1: Backward C
This method works for guitars with two humbuckers.
Step 1: Find the Potentiometers
The potentiometers are the bottoms of the volume pots on the face of the guitar. They’re also what you’ll use to ground your guitar.
Step 2: Connect the Potentiometers
Before starting, a word of warning – if you haven’t soldered before, be very, very careful. It gets extremely hot. In fact, solder melts at twice the temperature of boiling water. You do not want to take this process lightly.
And it’s good practice to wear safety goggles too, especially if you’re a beginner. You don’t want to do something that might cause hot solder to fly off into your eyes.
Let’s get going. Measure out and cut a piece of wire long enough to link the top left potentiometer to the top right one. Solder one end of the wire to the top left potentiometer, and the other end to the top right to connect them.
Repeat this with a piece of wire from the top right potentiometer to the bottom right one, and then again from the bottom right one to the bottom left one. Do this correctly, and you’ll create a backward C.
You’ll notice another wire connecting the top potentiometers to the bottom ones – this is the wire that connects them to their associated pickups. On one the left side, they’re connected to the neck pickup.
Because this wire is there, it might lead you to think that you can connect the bottom potentiometer to the top one in the same way that you created the backward C. But this would not do you any good. This will create an even worse ground loop, since the static just continuously cycles through the circle.
Even if you don’t create a loop, the backward C shape could come with it’s own baggage of static, because it’s as close as possible to being the correct shape to create an antenna (like those looped wires in the single coil pickups we mentioned earlier). But there is another method that can prevent this.
Method 2: Star Power
Step 1: Connect the Potentiometers to a Central Pot
We’ll assume you’ve found the potentiometers.
Instead of connecting the wires as in the above method to create a backward C, dedicate a central potentiometer to connect all the others to. Let’s say the bottom right one, for this example.
Start at the top left potentiometer, and measure and cut a wire long enough to connect it to the bottom right one. Then solder that wire to connect the two potentiometers.
Now, measure, cut, and solder a wire from the top right potentiometer to the bottom right one. And repeat this for the bottom left potentiometer to connect it to the bottom right one as well.
If you do this correctly, you’ll create somewhat of a star pattern, if you look at it and include the two wires that run from the bottom right potentiometer to the guitar claw and output jack.
This method is definitely the better of the two detailed here to avoid ground loop and hum for guitars with two humbuckers. It resists EMI and is also a foolproof way of preventing yourself, or anyone else who might service your guitar in the future, from accidentally creating a ground loop.
Method 3: Steel Plating
If your guitar’s control cover is made of metal, like with Fender Telecasters, you could inadvertently create a ground loop by trying to ground it more than you actually need to.
This kind of ground loop is actually far worse than the ground loop you might create or hear in guitars without a metal covering. That’s because it creates many loops between the potentiometers and the cover, constantly sending the signal back and forth and creating havoc with the static.
Step 1: Check the Surroundings
Check that your potentiometers aren’t already connected to the metal cover. If they are, you don’t have to do a thing. In fact, we implore you to not do a thing – if you add a wire because you think that there is nothing grounding the signal, you’ll be doing yourself a disservice. You would actually create a ground loop rather than getting rid of it.
Step 2: Create a Star (if necessary)
This differs from creating a star for humbucker pickups, in that you’ll connect grounding wires from the pickup to the potentiometer that sits just beside the bottom pickups.
To do this, solder a wire to the bridge pickup, and then connect that wire to the potentiometer. Repeat this for the middle pickup, and then again for the bottom pickup.
As with the star grounding method for humbuckers, the star shape is created by these three wires being connected to the potentiometer, and the claw and output jack wires that come from that potentiometer.
Common Mistakes And How To Avoid Them
Don’t add wires just for the sake of adding them, because you think that more wires equals less ground loop. It really doesn’t! As you saw in the backwards C shape method, adding too many wires actually causes ground loop, or makes it worse.
Another common mistake is to not ground everything. Even in the star method, where you’re grounding to only one potentiometer, you still need to ground all the pickups, the pickup switch, and the jack sleeve tab.
If you don’t, the hum might persist, and you might find yourself in an even more confusing situation than before. So take your time when you’re grounding your guitar, and make sure you do it properly.
Grounding Your Guitar: Final Thoughts
Most people will not need to ground their guitar. Whether it is a baritone guitar or one with a standard scale length, it should already be grounded when you buy it.
If you think yours might need grounding, do the quick test mentioned above to make sure you don’t do any unnecessary work on your guitar. If it turns out that you do have a ground loop, follow the instructions in this post to properly ground your guitar.
Just don’t go touching any mics on a non-grounded trem or you will regret it. Just go through your axe controls and test for ground continuity on all metal parts and ground soldered joints, shield, trim, and jack. If it doesn’t beep then find a way to ground it or check for cold solder joints. You only really need for one point of contact on you pot for ground looping. Make sure you have a soldered or starred connection to the shield and to the control grounding point along with the main ground to the jack and the tremolo. Do all that and the rest is usually something else outside your guitar like an amp, chord, or poorly grounded pedal. Try grounding the pedal or omitting it from the channel chain to reduce buzz and hum. If you have single coil pick-ups you will most likely have some hum, but if the hum is still intolerable then I strongly suggest Fender noiseless pick-ups especially in the neck. Even with a perfect faraday a single coil is gonna hum because they are essentially little pole antennas picking up slightest EMI or RF. Also try using a .047 uF caps instead of .022 uF on tone and volume controls to lower the frequency a tad. Oh and make sure your pick-up magnets are well shielded and clean from metallic debri by using a slightly stronger magnet to clean the poles.
Hey. Please, i think it’s my guitar that grounds me like you explained from your write up because the buzzy sound stops when I touch the strings. Please how do solve this problem?
The answer is in the article. If you’re unsure, it may be best to take it to a professional to have them fix the issue.
No, the answer is not in the article. You didn’t understand the question. I quote: “If the humming stops, you don’t have a ground loop issue.” Well maybe you don’t have a ground loop issue, but you still have a problem. So many articles, including yours, seem to assume that if the humming stops when you touch the strings, the guitar is working correctly. No, it isn’t. Because I have guitars that don’t hum at all, any time. It should not be necessary for me to be touching the strings or anything metal for the guitar to be quiet. I know this is possible because I have guitars that work correctly like this. And I have other ones which require me to touch the strings. This is a problem. It needs an answer. It may not be a grounding issue, it may require shielding or something else, but don’t say you’ve answered the question when you haven’t even understood the question.
Your guitar does not need shielding. You have basic problem with bridge not being connected with the ground by wire. In this situation strings act as antenna and your hands ground it. Read basic materials first.
Re: “Beyond the hum and buzz, there is also an element of safety to grounding your guitar. Any electrical device that isn’t ground properly has the proclivity to give you a shock – a nasty one in some cases.”
Please describe one real world circumstance where it is safer for the player to be grounded (via the String-Ground connection), than it is for the player to be isolated from Ground.
Thank you in advance.