 Is it really possible to see any improvement in just a week?
It is. And you only need to spend 15 or 20 minutes per day to do it.
Most beginning singers do a lot of little things wrong.
Fixing those little things leads to a huge improvement in their singing voice.
Taking 15 minutes to work on one specific technique per day allows you to perfect the basics in under a week.
Getting your posture, your breathing and your mouth and tongue position right will have a dramatic effect on your voice.
Then you want to add a good warm-up routine to ensure you don’t damage your new voice. For a more in-depth tutorial on the basics of singing, see this post.
Before launching into the week, I highly recommend choosing a song you like and recording yourself singing it. We’ll revisit this recording at the end of the week and see how much you have improved in such a short time.
Here’s how to improve your singing voice in a week.
Table of Contents
Improve Your Singing Voice: One Week Of Short Exercises
Do these exercises for 15 to 30 minutes a day maximum and you will see an improvement to your signing voice by the end of the week. In fact, you will see improvement even after the first day. Simply fixing your posture has a huge impact on your voice.
Day 1 — Posture
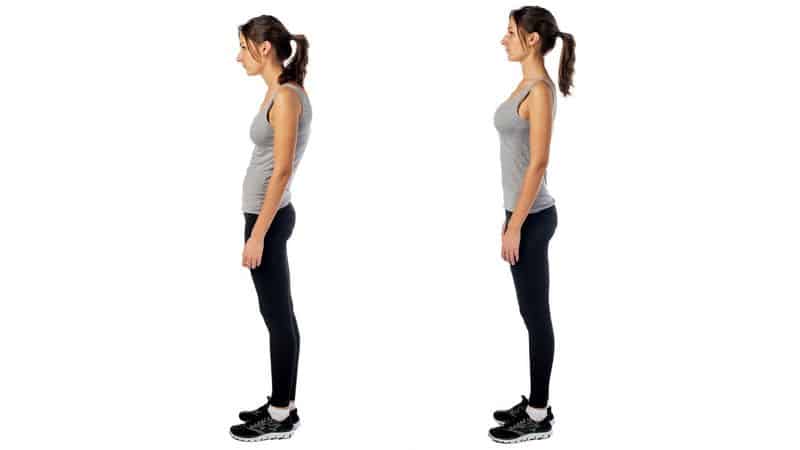
Fixing your posture is the easiest way to improve your singing, so we’ll start our week by working on that.
Correct posture eases tension and makes it easier for air to flow through your body, which in turn helps you project your sound, hold your notes longer, improves your enunciation and reduces your energy expenditure.
To fix your posture, stand with your feet shoulder-width apart and imagine a hook pulling you upward from the top of your head. Your shoulders should be back and down and your head upright. Make sure to keep your knees are unlocked and your muscles relaxed.
It might help to stand with your back to a wall so that your heels, calves, buttocks, shoulders and head are all making contact with the wall.
Hold this position for a few minutes, then try slouching, just to feel the difference. Practice standing up straight like this for 15 minutes and you’re done for the day.
Day 2 — Correct Breathing Technique
 If you can’t breathe, you can’t sing and I’m sure you’ve heard this before, but I’m going to tell you again anyway: you need to breathe using your diaphragm.
That is the only way to ensure you have the necessary air flow to sing well. You know you are breathing correctly when your abdomen rises with each breath and not your chest.
To practice breathing correctly, start by lying down flat on your back with your hands placed on your abdomen (or use a book).
Breathe in through your nose so that your abdomen rises, taking your hands (or the book) with it. Breathe in deeply and hold your breath for 10 seconds.
Then breathe out slowly and gradually through your nose and mouth, to mimic the slow release of breath during singing. After a few tries, make a hissing sound while exhaling and after doing that a few times, sing an easy note.
Now stand up and adopt the correct singing posture you learned yesterday and practice the same breathing technique some more. Make sure your shoulders remain relaxed and level throughout; they should not be moving at all. After 15 minutes of this, call it a day.
Day 3 — Breath Control

Breathing with your diaphragm is just the first step. Now that you’ve got that down, you need to practice controlling your breathing to ensure you never run out of breath when singing.
I’ve got a couple of exercises you can do to help improve breath control.
First, work on rapidly inhaling. This is an important skill while singing, since you often need to replenish your breath during very brief pauses.
Try filling your lungs with air very quickly (remembering to breathe into your abdomen, not chest) and take note of how your body feels. Get used to this feeling so that you can easily duplicate it while you are singing.
After holding your breath for a few moments, exhale slowly, just like you did in the last exercise, singing an easy note the whole time.
Now you want to practice lasting through many beats without running out of air.
Every time you breathe out during this exercise, sing an easy note, making sure the note remains steady throughout. Begin by inhaling to the count of 4, then exhaling also to the count of 4 (don’t forget to breathe into your belly and to sing a steady note on the exhale).
Follow that up by inhaling to the count of 6, then exhaling to the count of 10. You need to control the exhale so that it lasts 10 counts. Now do it again, but this time exhale to 12.
Next, reduce the inhale to 2 counts, keeping the exhale at 12 (rapid inhale, just like you practiced earlier). Follow by going in for 4 and out for 16, then in for 2 and out for 16, then in for 4 and out for 20 and finally in for 1 and out for 20. Were you able to nail that last one?
Let’s finish out day 3 by practicing some snatched breaths.
Do this by breathing in 1/4 of the way on one count. Then breathe in another quarter on another 1 count.
Do this twice more until your lungs are full of air. Breathe out gradually for 8 counts. Finally, breathe in halfway on one count and complete the breath on a second count. Breathe out for 8 counts. That completes day 3.
Day 4 — Mouth and Tongue Position

You’ve learned how to stand and how to breathe. Now we need to make sure you know how to position your mouth and where to keep your tongue. It is the final step in mastering the basics.
It is important to keep your head level and your chin back. A lot of beginners have a tendency to jut their chins forward, but this closes off the sound. When singing, open your mouth wide for the vowels, much wider than you normally would.
A good way to practice this is to say the vowels with your mouth wide open and take note of when you tend to try and close your mouth. This will help you know on what parts of what vowels you need to take extra care. You always want to have your mouth open wide enough to fit two fingers sideways between your teeth.
When it comes to the tongue, you mainly want to keep it out of the way of the air flow. Most of the time, you’ll keep the tip lightly touching the back of your bottom teeth. When you sing vowels, move it up to your top teeth, but make sure it doesn’t go back and block the throat at all.
Day 5 — Proper Warm Up
This is the day to put everything you’ve worked on previously together and do some actual singing. Well, you’ll be learning how to warm up correctly, but it’s a form of singing, right?
Start your warm-up by getting your mouth and jaw loose. Massage your cheeks with the heels of your hands and yawn a few times. Move your jaw around to loosen it up.
Next do some humming.
Put you tongue in its singing position (behind your bottom teeth) and begin humming with your mouth open. Close and open your mouth a few times while humming.
Remember to adopt the proper posture, to breathe correctly and to keep your head, mouth and tongue in the proper position.
After humming, move on to lip trills.
Basically, blow air out and let it vibrate your lips. Then do some staccato beats. Sing short “ha ha ha” sounds.
Next, do some kazoos. Purse your lips and sing a “woo” that sounds like a buzz, going into the upper limits of your range and back down.
Finish your warm-up routine by going through the scales. Hum them first, then sing them.
The American Academy of Otolaryngology has more on these, and other, warm-up techniques.
Day 6 — Sing
On this day your task is to once again, after warming up properly, sing the song you recorded at the beginning of the week. Record yourself again and marvel at the difference.
Your singing voice will sound bad when recorded and played back, if you are not used to it. But you get used to that, so ignore it and focus on the improvement.
Isn’t it amazing how much better you sound today today than you did a mere 6 days ago? And remember, you only spent 15-20 minutes per day on your singing, too!
Day 7 — Rest
This is an important lesson: you always want to give you vocal cords one day of rest per week. Practice singing 6 days a week and take the seventh off. Without the day off, you risk damaging your vocal cords.
How To Improve Your Singing Voice In A Week: Final Thoughts
While you won’t become a professional singer in a week (it takes years), it is certainly possible to see huge improvements in a week’s time. At least if you are starting out as a beginner.
When we first start out as singers, we all do the fundamentals wrong. Improving on those leads to an immediate improvement in our signing voice. And don’t forget those warm up exercises!
A good warm-up routine is the key to everything. Since warming up is so important, here is a good video on the subject.
Finally, it is also important to know your voice type. That allows you to choose songs from singers with the same voice type. Choosing songs for other voice types means you would never be able to sing them as well as songs that do fit your type, so this is importnant.
hey my name is Thejane from bloemfontein, I’m really really interested in in singing, can I have personal trainer, is possible please
Of course it is possible. It is the best way to learn.