 Want to sell your music?
Then you need your own website.
Whether you’re a solo artist or a member of a band, a singer or a violinist, nothing does more for your promotional efforts than having your own website.
The problem is most musicians have no idea how start one.
And hiring someone can cost several thousand dollars.
But there’s good news: setting up a website is actually incredibly easy.
And the costs are minimal, too. You can even do it for free, though spending a little money yields a far better site.
Follow these steps and you’ll have your very own site up and running in under an hour.
Note: I receive a small commission when you sign up for recommended services on this page, like Bluehost, Namecheap, or Studiopress. But I recommend those companies, because I use them myself and am happy with the services they provide.
Make Your Own Music Website
The five steps below will take you through the entire process of setting up your very own music website. It is not overly complicated, but if you have never done anything like this before, you should expect it to take a few hours. But after that, you will have a website to call your own!
Step 1: Choosing Your Domain Name
A website’s domain name is what you type into the browser to reach said website. For example, the domain name of this site is: musicaroo.com. In this case, it is also the name of the site.
That is not always the case. For your site, you’ll probably want to choose your name or your band’s name, if available. This is what most artists do and it makes the most sense. For example, if you search Google for Lana Del Rey, you’ll find her website, lanadelrey.com.
The easiest way to check on the availability of a domain name is to go to Namecheap. You’ll see a search field at the top of the page. Simply type in your chosen domain name and add .com to the end. Hit search and the next page will show you if the .com version is still available. It will also show you the availability of the various alternatives, like .org or .net.
 Personally, I would only ever buy the .com version, but a .net or .org domain is fine, too. Anything else will just seem spammy.
If the .com you want is not available, but the .net or .org is, you can go ahead and get one of those, though I would probably try to find an alternate domain name.
The reason is that someone else obviously owns the .com (since it is unavailable) and a lot of your fans might assume you own the .com and accidentally go to the other person’s site, not yours.
Domains on Namecheap cost around $10. It is possible to get a website for free, but you will not get the domain name you want. There are a number of sites that will let you set up a website completely for free, including the domain name. The two best are WordPress.com and Blogspot.com.
If you use a site like this and choose the free domain name option, you will end up with a URL that includes the domain of the site you use. Using Lana Del Rey as an example again, her free site on WordPress would be www.lanadelrey.wordpress.com. This simply does not come across as professional.
Apart from the domain name, there is another problem. When you get a free site with one of these providers, the provider retains control of your site. They have the right to shut it down at any time, if they disagree with any of your content. They also severely limit your ability to earn money from your site, should you ever want to sell advertising space, etc.
I strongly recommend you pay the $10 and get your own domain name. That’s a small price to pay to have full control over your domain and to get the name you want.
If you absolutely can’t afford it at the moment, go ahead and start with a free domain. You can always switch later, but you should know that it is a huge hassle. Most people end up just paying someone to do it, which can easily cost around $100.
Once you’ve decided on a domain name and have found that it is available, don’t purchase it yet. You’re probably going to want a hosting plan (if you don’t already have one) and many of those come with a free domain name. It’s also much, much easier if you buy both together.
If you already have hosting, then I’d just get the domain name from Namecheap. They’re cheap and reliable. It’s where I buy my domain names and where most people who know what they are doing get theirs.
Step 2: Setting Up A Hosting Account
Hosting will be the most expensive part of setting up a website. But it is also possible to get hosting that is completely free. Naturally there are some drawbacks. Personally, I would go with paid hosting. I’ll explain why below.
Is free hosting any good?
Free hosting works just fine, so if you just want to get a website set up for the time being, you can go ahead and use one of the free hosts (just do a Google search for ‘free webhost’ and you’ll find hundreds).
 I do not like free hosting, because it is not very reliable. Free hosts generally suffer from a lot of downtime, meaning your site will not be accessible.
More than that, free hosts post their own advertisements on your site. This limits your ability to make your own money from ads, but more importantly, it can leave a bad impression on your visitors.
Not only can ads be annoying, but depending on what is being advertised, they can be damaging to your personal brand.
If you don’t have any money at the moment, you can start out with a free host and switch to a better one later. Switching hosts can be quite difficult, but hosting companies want your business, so almost all of them will happily take care of the switch for you.
If you’d prefer to avoid that process entirely, good webhosts don’t have to cost much. Basic accounts at most hosts cost a few dollars a month and that is what I pay to host this site with Bluehost (more on them below). They are my favorite host, but you can actually get a very good host even cheaper.
Namecheap does not just sell domain names, they also offer some of the cheapest hosting you will find. And unlike other cheap hosts (we’re talking a dollar or two per month here), Namecheap is a recognizable brand and their hosting is reliable.
I still prefer Bluehost, because you get a lot more, but for basic hosting for a new website, Namecheap offers everything you need.
My Favorite Host
I have used a number of different hosts in the past and finally settled on Bluehost. They are one of the cheapest (not counting the dollar hosts, who are universally bad), very reliable (i.e. little downtime) and they have great customer service that has basically taken care of anything even remotely technical for me.
Like any good host , they also offer a simple one-click install for the WordPress software. This is different from the free WordPress websites mentioned above (but the same company). WordPress is software that makes it as easy as possible to get a website up and running. Best of all, it’s completely free.
The setup process for WordPress can be a bit complicated, but Bluehosts ‘one click install’ makes it simple. Their customer service will help you out as well, if you still have any questions. I cover the whole process farther down this page as well.
Bluehost is not the cheapest host, but it is the same price as all the other large and well-known budget hosts and among them, it is the most reliable.
This link will get you a sizable discount on their hosting accounts (plus a free domain, which would otherwise cost another $10). Bluehost is also well-known for having excellent customer service.
Here is the signup process for Bluehost:
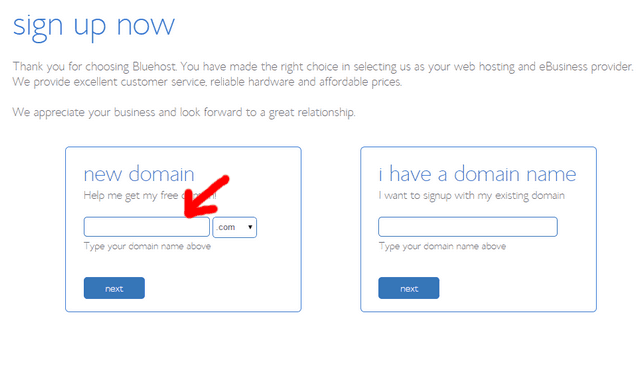
If you do not yet have a domain, enter the name you chose for your domain in the box indicated by the arrow above. Also select whether it is a .com or .net or something else. If you have already purchased a domain from a different site, type the name into the second box that says, “I have a domain name.”
On the next screen, fill in your personal information. Then you’ll come to this:
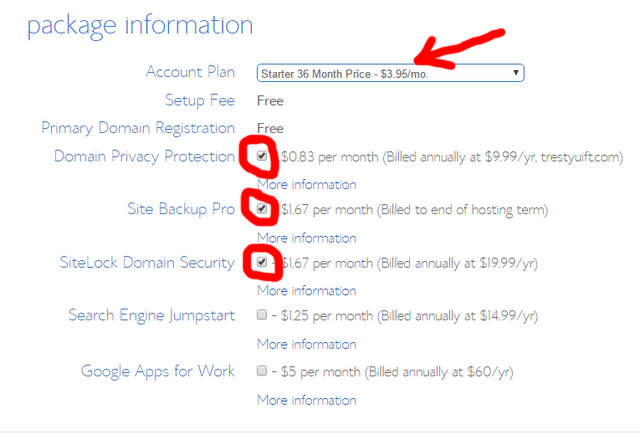
This is where you choose your account plan. As you can see, the longer the time period you commit to, the less you pay per month. But they require upfront payment, so the amount of money you have to pay now will be larger for longer plans.
Choose whatever you feel most comfortable with. You also want to make sure you uncheck any of the up-sells you don’t want. Personally, I uncheck them all. I have never needed any of them and I doubt you will either. If you do, you can always add them later. For now, save your money.
Fill in your credit card information and submit everything. You now have a working domain and a web host. You’re ready to set up the WordPress software (i.e. build your site).
If you purchased your domain elsewhere, you will have to transfer it to Bluehost before you can set up your site. This can take up to 48 hours and can be a bit complicated. You best bet is to contact Bluehost customer service. They will help you out.
Step 3: Installing WordPress
This is a simple process, if you have a hosting account with Bluehost:
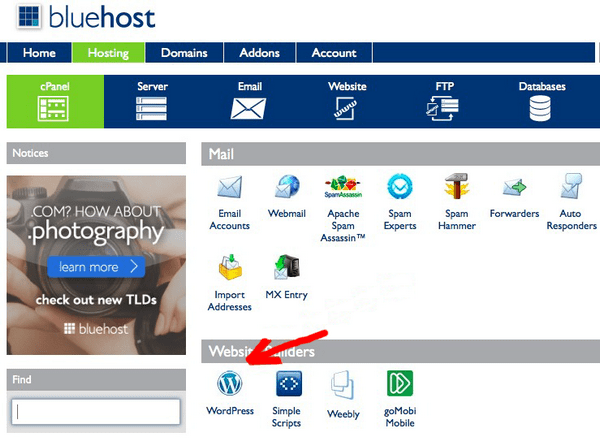
Under the ‘Hosting’ menu and the ‘cPanel’ tab (highlighted in green in the photo above), you can see a section titled ‘Website Builders.’ You might have to scroll down to find it. Click on WordPress. That’s basically it. Follow the on-screen instructions and your website will be ready in a couple of minutes!
If you are using a different web host, chances are they also have a one-click install for WordPress, though it may not be quite so easy. If they don’t, you will have to setup WordPress manually. It’s not the easiest thing in the world, but if you follow the steps here, you should be able to do it in under 20 minutes.
Step 4: Choosing A Theme
The theme is what will determine the overall look of your site. One great thing about WordPress is that it features thousands of themes. Many are paid, but hundreds are free, too.
And a lot of the free ones are quite good. WordPress themselves come out with their own free theme every year. This is the theme that will be preinstalled when you first set up WordPress.
Go ahead and check it out now. To do that, start in the WordPress Dashboard (this is the page you will be on after logging in in the last step) and move your mouse over the little house icon at the top left of the screen.
The words ‘Visit site’ will pop up. As you might have guessed, click on this to see your site. Even better, right-click on it and select ‘Open Link in New Tab.’ This way you can switch between tabs to see the changes in your site when you change themes.
Free Themes
If you like what you see now, that’s great! You can just keep the theme that’s already set up and move on to the next step. More likely, you’ll want a different look. Look for the word ‘Appearance’ in the menu on the left-hand side of the screen and hover over it with your mouse. Select ‘Themes.’
This will bring up a screen showing all the pre-installed free themes, including the one that is currently active. You can try several of them out by hovering over them and selecting ‘Live Preview.’
 While all of these themes are excellent, none of them really makes for a great music site, in my opinion, at least not without making significant changes that would require some knowledge of html and css.
If you don’t know what either of those are, you don’t have the required knowledge and you don’t want to mess with it anyway (trust me, I’ve tried).
Toward the top of the screen, there is a small box that says ‘Add New.’ Clicking it brings up a screen with hundreds of other free themes.
You should be able to find a theme you like here. Just hover over them and click ‘Preview’ to see what they look like.
If you find one you like, hover over it and select ‘Install.’ It should only take a few seconds. Once it is finished, click on ‘Activate’. Your site is now ready.
Switch over to the tab with your site in it and hit refresh or click on ‘visit site’ again, if you did not open a second tab earlier. That is the latest version of your site. We will fix it up a bit below, but first lets talk about paid themes.
Premium Themes
I’m sure you’ve heard elsewhere that premium theme are better and you should always spring for one. That’s not necessarily bad advice.
Most premium themes don’t cost all that much and apart from a usually more professional look, they offer support. If you ever have any questions or problems with the theme or just need help making modifications to your site, premium themes have people on hand to help you. Free themes do not offer any kind of support.
 I’ve started a few sites and every time, I’ve begun with a free theme and then switched to a paid theme later.
It’s very easy to switch themes, but if you have done any customizing, those customizations will usually be lost. Because of that, I always ended up wishing I had just gone with a premium theme from the start.
My advice would be to browse the free themes and if you see one you really like, go with that.
If you don’t find the perfect theme for you, browse through some paid themes. If you find a good one there (and you will) just go ahead and spend the extra money, as long as you can afford it.
There are a ton of theme providers, but you’d be best off going with one of the big ones. They have the largest selections and they have a long track record of making great themes and keeping them updated. They also offer excellent support.
My favorite provider is Studiopress. All their themes use the same basic framework (called Genesis). The different themes are then built on top of that framework, making for a very slick and elegant website.
You could just get the framework and make any changes you want on your own, but this would take some skill. Your life will be much easier if you get one of their ready-made themes in addition to the framework.
The only drawback with Studiopress is that their selection is quite small, with only about 40 different themes. Musicaroo uses one of them: the Magazine Pro theme. If you like one of the Genesis themes, that’s great! They’re probably the best built themes out there.
If you don’t see a theme you like, try some of the other large providers. Elegant Themes or Themeforest both make excellent themes that look sleek and modern.
They also have a much larger selection of great themes and they don’t cost much either. You will almost certainly be able to find a suitable theme from among the huge selection of free ones and the three premium providers listed above.
Step 5: Creating Your First Page
I’m sure you’ve already checked out the new look of your site now that you’ve got a theme. If so, you’ve certainly noticed that there’s not an awful lot of content there.
Let’s change that and get your first page set up. To do this, we need to make a few changes to the settings first. Hover your mouse over ‘Settings’ in the left-hand menu and select ‘General Settings.’ You will see to this screen:
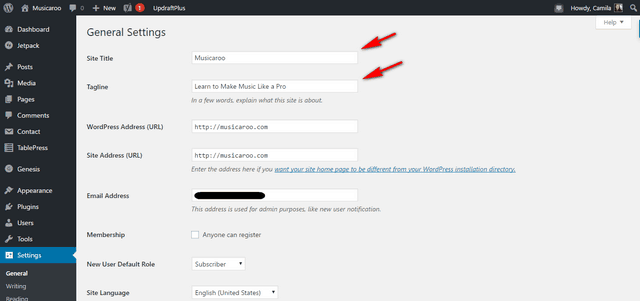
Double check what it says under ‘Site Title’ and ‘Tagline.’ This might already done, but if not, fill in the name of your site and your tagline. When you’re done, scroll down to the bottom of the page and click on ‘Save Changes.’
Now it’s time to add some pages. Move your mouse over ‘Pages’ in the left-hand menu and select ‘Add New.’ That will take you to this screen:
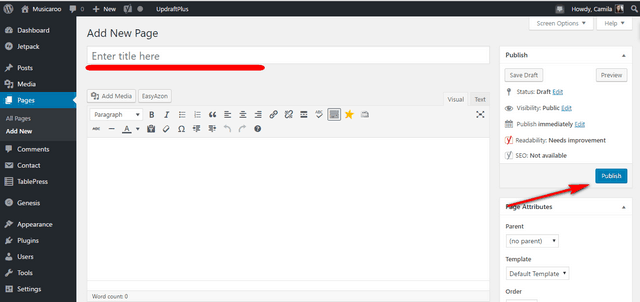
We will create your home page first. This is the front page of your site and the first thing most visitors will see. In the space you see underlined in red above, you want to enter the title of your page. Whatever you enter here will show up at the top of the page. You can call it ‘Home’ or ‘Welcome!’ or anything you like.
The large blank space below that is for the content of the page. You can write anything you like here and also add photos, videos, etc. For now, just write something simple.
Maybe write a brief bio that just introduces you and your music. If you do want to add a video, you can just paste the URL wherever you want the video to show up and it will automatically appear on your page in that location.
Eventually, you will definitely want to include some videos. This is the best way to introduce yourself and your music.
When you are finished filling out your content, click the blue ‘Publish’ button on the right. Once the page has been published, you will see an option at the top that says ‘View your page.’ You can probably guess what that does.
Go ahead and view your page. If you want to make any changes to your page, simply click on the ‘Edit page’ option in the black bar at the top of the screen when you are viewing your page (note: you will only see this bar when you are logged into WordPress).
Creating a page is pretty simple, right? Let’s make another one. Do you remember what to do? First click on ‘pages’ and then ‘add new’. For this page, make the title ‘Blog’. Leave everything else blank and just hit publish. This automatically sets up a blog page for you.
Whenever you publish a new blog post, a link to that post will automatically appear at the top of this page, followed by all the previous posts. If you prefer a different name, you can call this page anything you want instead of ‘blog’. Whatever name you give it, that name will appear at the top of the page.
Now that we have a page ready to act as our blog page, we need to let WordPress know that it should use it for that purpose. Hover your mouse over ‘Settings’ in the left-hand menu and select ‘Reading.’ You will come to this screen:
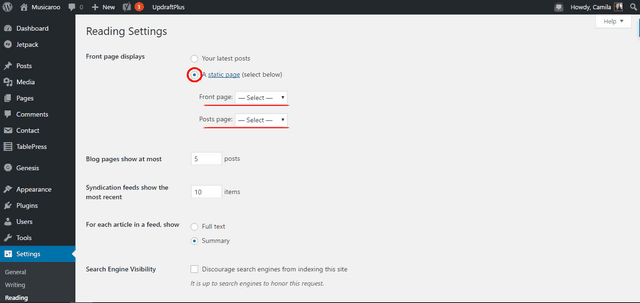
Click on the circle next to ‘static page’ (circled in red above). This makes your home page a fixed page instead of a blog page. This means that the front page of you your site will always be the same (the content you entered earlier) and not a list of your previous posts.
If you want it to be a listing of posts, choose the other circle. For an artist or band site, it generally makes more sense to have a fixed front page, though, so we’re going to go with that here.
In the ‘Front page’ box, select the page you created above. In the ‘Posts page’ box, select ‘blog’ or whatever you called your blog page above. Once you’ve made the changes, scroll down to the bottom and click on ‘Save changes.’
Create Your Own Music Website: Final Thoughts
You now have a (admittedly very basic) website. You’ll probably want to add more pages in the future (you remember how to do that, right?) and perhaps even post regular entries on your blog page to keep your fans up to date.
Making a blog post is basically the same as creating a page, except you choose ‘add new’ under the ‘posts’ section in the left-hand menu, instead of the ‘pages’ section.
All of that comes later, though. For now, sit back, relax and have a cold beer, or whatever drink you prefer. You’ve just created a brand-new website from nothing and you deserve that drink!
website shows that the band or musician is really serious! maybe at this time there are still many musicians who only rely on social media for promotion! even though to make a website actually doesn’t require too much money! one of its main advantages is the integration which makes it a single gateway for all band monitoring and promotion! this is one of my friend’s band website; https://www.colderra.com I think with a model like that is enough! So in addition to using social media or other free facilities, having a website in my opinion is very important